How to Remove Wallpaper Efficiently
How to Remove Wallpaper Efficiently

Before you begin decorating, it’s important to remove any existing wallpaper properly. If this isn’t carried out, it can negatively affect the final results of your project. For example, attempting to apply new wallpaper over the existing layer can lead to the following:
-
Mould and/or mildew growth
-
Peeling
-
Uneven finish
-
Bubbling
To achieve the desired outcome for your project, you can follow this in-depth guide. It is designed to educate DIY enthusiasts and trades people on how to remove wallpaper efficiently.
It will do so by providing information about the tools, materials, techniques and step-by-step instructions needed to do so.
Shop Wallpaper Related Categories
Preparing To Remove Wallpaper
A key part of removing wallpaper is the preparation beforehand. Below are the necessary steps of preparation.
Choose the right type of wallpaper
There are two main categories of wallpaper, traditional and peelable. All wallpapers fall into one of these categories. Peelable is much easier to remove, as the name hints, all that is required is for it to be peeled off. Whereas traditional wallpaper can be stripped away but requires more work (e.g. steaming and/or scoring)
Ensure the area is safe
Safety is paramount for any project. Before proceeding with removing wallpaper, you should carry out the following:
-
Clear the area of any furniture or any other items that can hinder your progress.
-
Protecting the floor from sticky residue by using plastic sheeting or a drop cloth.
-
Switch off the power at the fuse box to prevent water/steam from damaging electrical sockets.
-
Cover electrical outlets
Test a small area first
This enables you to test your technique and get used to removing wallpaper, without damaging the wall. This is particularly important if it’s your first time attempting to remove wallpaper.
Check for hidden hazards
In some older homes, particularly those built before the 1940s and before the 1980s, there can be hidden hazards such as asbestos or lead paint. If the home you are working on fits this description and hasn’t had a professional inspection for both, it’s strongly recommended that you do so before proceeding.
What You’ll Need To Remove Wallpaper
-
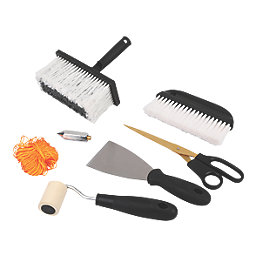
Buckets and sponges: For applying removal solutions to the wallpaper.
-
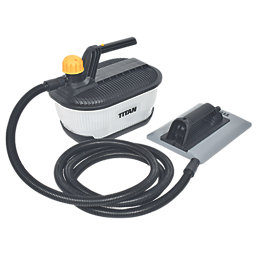
Wallpaper steamers: An electrical tool that helps to melt adhesive by using hot steam.
-
Masking tape: Secures plastic sheeting in place, as well as covering electrical sockets.
-
Safety goggles and gloves: To protect eyes from debris and skin from hot water and chemicals.
-
Wallpaper scorer: To perforate the wallpaper surface, enabling steam to penetrate the adhesive without damaging the plaster.
-
Plastic sheeting/drop cloths: These protect the floor and any furniture from being damaged by water or residue.
-
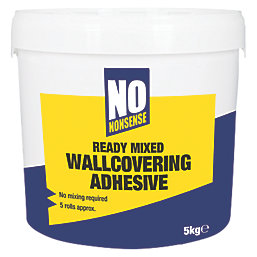
Chemical Wallpaper remover: A concentrated solution that is used to dissolve adhesive.
How To Strip Wallpaper With A Chemical Wallpaper Remover
This is a step-by-step guide on how to strip wallpaper with a chemical wallpaper remover.
Step 1 - Prepare the room and yourself
-
Clear the area of any furniture or other obstructions. Use drop cloths to protect the floor from the solution and water.
-
Turn off the power to the room at the fuse box. Cover all sockets and switches with masking tape or plastic sheeting.
-
Ensure the room is well ventilated by opening as many windows as possible.
-
Ensure you’re wearing safety goggles and protective gloves to protect your eyes and hands.
-
Mix the wallpaper concentrate with warm water to the exact specifications of the manufacturer.
Step 2 - Score the wallpaper
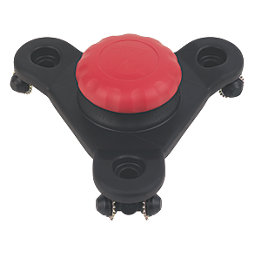
Use a wallpaper scoring tool, such as a Paper Tiger, to lightly puncture shallow holes in the wallpaper.
If you are scoring a large area, drag the tool in a circular motion.
Be sure not to puncture the drywall underneath the wallpaper.
This particular step is arguably the best way to remove wallpaper that is very sticky and difficult to remove.
Step 3 - Apply and soak the solution
Use a sponge, pump sprayer or broad brush to apply the solution to your chosen area at the bottom of the wall. This can be approximately 1m x 1m in size.
Start at the bottom and work your way up the wall.
Follow the specific manufacturer’s guidelines when it comes to soak time. This usually ranges between 5–15 minutes.
Do not let the area dry out.
Step 4 - Strip the wallpaper
Use a stripping knife or a scraper to carefully get access to underneath a corer or seam of the paper.
Peel or scrape the wallpaper using short, sharp movements. Keep the scraper or the knife as flat to the wall as possible to avoid damaging the surface underneath.
If, after doing this, the wallpaper still hasn’t come off properly, apply more of the chemical solution, let it soak for the appropriate amount of time, and repeat the process.
Step 5 - Clean up
Once the wallpaper has been removed, use a sponge, along with clean warm soapy water, to wipe down the whole wall, removing any traces of the adhesive residue.
Allow the wallpaper to dry completely; refer to the manufacturer’s guidelines for a specific time. When it is dry, inspect the wall for minor gouges or holes before applying new wallpaper or painting.
How To Remove Wallpaper With A Steamer
This section will provide a step-by-step guide on how to remove wallpaper with a steamer.
It’s important that the first two steps, which cover the preparation and scoring, are the same as removing wallpaper with a chemical wallpaper remover.
Step 1 - Prepare the room and yourself
Clear the area of any furniture or other obstructions. Use drop cloths to protect the floor from the solution and water.
Turn off the power to the room at the fuse box. Cover all sockets and switches with masking tape or plastic sheeting.
Ensure the room is well ventilated by opening as many windows as possible. Ensure you’re wearing safety goggles and protective gloves to protect your eyes and hands.
Mix the wallpaper concentrate with warm water to the exact specifications of the manufacturer.
Step 2 - Score the wallpaper
Use a wallpaper scoring tool, such as a Paper Tiger, to lightly puncture shallow holes in the wallpaper.
If you are scoring a large area, drag the tool in a circular motion.
Be sure not to puncture the drywall underneath the wallpaper.
This particular step is arguably the best way to remove wallpaper that is very sticky and difficult to remove.
Step 3 - Set up the steamer and apply steam
Fill the steamer’s water tank and place it on a flat surface away from your work area. Plug it in so that the water can begin to heat up and start producing steam.
Apply the steam to the wallpaper by placing the steamer at a bottom corner or seam of the wallpaper. Hold the steamer completely flat against the wallpaper for between 10–30 seconds.
Step 4 - Strip the wallpaper
Use a stripping knife or a scraper to carefully get access to underneath a corer or seam of the paper.
Peel or scrape the wallpaper using short, sharp movements. Keep the scraper or the knife as flat to the wall as possible to avoid damaging the surface underneath.
If, after doing this, the wallpaper still hasn’t come off properly, apply more of the chemical solution, let it soak for the appropriate amount of time, and repeat the process.
Step 5 - Clean up
Once the wallpaper has been removed, use a sponge, along with clean warm soapy water, to wipe down the whole wall, removing any traces of the adhesive residue.
Allow the wallpaper to dry completely; refer to the manufacturer’s guidelines for a specific time. When it is dry, inspect the wall for minor gouges or holes before applying new wallpaper or painting.
How To Peel Wallpaper
This section will provide you with a step-by-step guide on how to strip wallpaper without using a solution or a steamer.
Step 1 - Prepare the room and yourself
-
Clear the area of any furniture or other obstructions. Use drop cloths to protect the floor from the solution and water.
-
Turn off the power to the room at the fuse box. Cover all sockets and switches with masking tape or plastic sheeting.
-
Ensure the room is well ventilated by opening as many windows as possible. Ensure you’re wearing safety goggles and protective gloves to protect your eyes and hands.
-
Mix the wallpaper concentrate with warm water to the exact specifications of the manufacturer.
Step 2 - Lift and test the paper
Find a seam or a corner, then use a putty knife to gently lift the edge of the wallpaper. Try to slide the knife under the wallpaper without damaging the wall surface underneath.
Once you’re able to lift a small edge, grasp it firmly and pull. The wallpaper should come off in large chunks. If it doesn’t, the wallpaper isn’t designed to be dry stripped, and you need to attempt either the Soaking method or the Steaming method.
Step 3 - Strip the wallpaper
With one hand, pull the wallpaper slowly at a 45-degree angle, down and away from the wall. With your other hand, gently apply pressure with the putty knife to help separate the paper from the wall.
Try to remove the wallpaper in large strips. This will help remove it faster.
When an obstacle, such as a door or window, gets in the way, use a utility knife to score the paper so that you can continue pulling the main strip.
Step 4 - Remove the backing adhesive
Firstly, attempt to peel the backing layer by hand. If it doesn’t come off, mix hot (not boiling) water and washing-up liquid and use a sponge to dissolve the adhesive.
Allow the solution to soak for 5 –10 minutes to enable the adhesive to fully soften.
Scrape the softened backing layer from the wall with a putty knife, keeping it as flat as possible to the wall.
Step 5 - Remove the backing adhesive
Once the wallpaper has been removed, use a sponge, along with clean warm soapy water, to wipe down the whole wall, removing any traces of the adhesive residue.
Allow the wallpaper to dry completely; refer to the manufacturer’s guidelines for a specific time. When it is dry, inspect the wall for minor gouges or holes.
Apply a coat of primer, preferably stain-blocking primer, before putting up new wallpaper or painting.
What Is The Best Way To Remove Wallpaper?
The best way to remove wallpaper depends on the type of wallpaper and how well the wall underneath it was prepared. The Step-by Step Guide to Treating Damp Walls Internally can help if the wall you’re working with has damp.
|
Steaming Method |
Soaking/Stripper Method |
Dry Stripping/Peeling Method | |
|
Ideal For |
Older, stubborn, multi-layered, or heavily glued wallpaper (e.g., woodchip). |
Wallpaper that has singular layers. It’s also, great for modern porous papers, and removing residual glue/backing. |
The more modern "peelable" or "strippable" vinyl wallpaper. |
|
How it Works |
Use a steamer to penetrate the paper and dissolve the adhesive. |
A liquid solution (stripper or DIY mix) soaks through scored holes to dissolve glue. |
The wallpaper is easily pulled off the wall in large strips from a seam/corner. |
|
Key Pros |
It’s arguably the most effective example of how to remove wallpaper. This is because it works on the most stubborn of wallpaper. It is also chemical-free. |
It’s inexpensive, and has a low risk of damaging the wall. The materials needed are easily accessible materials. |
This is the fastest and cleanest method of wallpaper removal. No chemicals or excessive water is required. |
|
Key Cons |
Requires special equipment (steamer); There is a risk of damaging drywall/plaster if overused/used incorrectly. |
Time-consuming (requires soak time); messy due to running liquid; chemical odour (if using commercial stripper). |
Only works for specific types of paper; often leaves behind the paper backing/residual glue. |
|
Prep Step |
Score the paper if it's vinyl or painted. |
Score the paper heavily to allow the solution to penetrate. |
Find a seam and lift the corner with a scraper. |
Aftercare And Wall Preparation
Aftercare and wall preparation are vital parts of the process of how to remove wallpaper. It’s important that after you’ve removed the wallpaper from the wall that you take the necessary steps to ensure that it’s ready for painting or a new layer of wallpaper.
Below are the key aspects of aftercare and wall preparation.
-
Remove leftover adhesive using warm soapy water or commercial glue remover. Apply the solution to the wall and let it soak for up to 3 minutes. Scrub with a non-abrasive pad to dissolve the tacky glue.
-
Wipe down the wall with a sponge and warm water to remove the remaining residue. Once this is done, it’s important that you know how to dispose of wallpaper paste properly so that
-
you don’t block any pipes or drains. It’s also important to avoid causing any environmental harm due to some chemicals in some wallpaper paste.
-
Inspect the wall, looking for small holes, tears and/or gouges. Fill in any of these that you find with a joint compound, and allow it to dry.
-
Sand the affected areas with 120-180 grit sandpaper until they are smooth. Remove the sanding dust by hoovering or wiping down the walls.
-
Apply a specialised sealing primer by rolling it evenly over the entire wall or walls. Allow it to dry for the correct length of time, according to the manufacturer’s instructions.
Key Things To Consider When You Remove Wallpaper
The key things to consider when thinking about how to strip wallpaper include:
-
The type of wallpaper you’re removing: This will dictate the type of method you need to use to remove the wallpaper (Steaming, Soaking/Stripper, or Dry Stripping/Peeling)
-
Taking adequate safety precautions: Ensuring that the area you’re working in is prepared for safely removing wallpaper. This includes switching off power, protecting floors and wearing protective clothing.
-
The right amount of aftercare and preparation: The better the aftercare and preparation, the better the result will be. Ensure that you’ve filled in holes, sanded bumps, and applied sealing primer to ensure that you and/or your client will be satisfied with this element of the project.
Once you’ve stripped the wallpaper, the how to wallpaper a room and corners guide can be a helpful next step.