How to Level a Garden
How to Level a Garden

Levelling a garden involves evening out bumps, dips, and slopes so that the lawn’s surface is safe, tidy, and ready for turfing, paving, or planting. Most domestic garden levelling jobs can be done by hand with basic tools, with no need for industrial machinery. In this guide, we’ll explain how to level ground safely and effectively, covering how to prepare the area, the hand-levelling process, and how to finish, so that the surface of your garden stays level in the long term.
Shop Garden Related Categories


Key Takeaways
-
Preparation and Drainage: Clear all debris and mark the target height using stakes and string lines; always assess water flow before starting to ensure the finished surface won't lead to pooling or waterlogging.
-
Methodical Soil Management: Remove existing turf in manageable strips, loosen compacted subsoil to help new material bind, and use a mix of topsoil and sand to fill hollows for improved structure and drainage.
-
Accuracy and Compaction: Check levels frequently with a spirit level and straight timber; compact filled areas in small stages (using a hand tamper or garden roller) to remove air pockets without over-compacting the soil.
-
Timing and Aftercare: Avoid working on waterlogged ground to prevent long-term drainage issues, and once finished, lightly water the area and re-check for resettlement after 24–48 hours before final planting.
When Do You Need To Level A Garden?
You should consider levelling a garden after building work, when rainwater starts collecting in hollows, or before you lay new turf or paving. Small bumps can be fixed when they’re noticed. However, persistent dips or a generally uneven surface can cause long-term drainage issues and poor grass growth. Taking preventative action sooner is generally easier and cheaper than repairing persistent root damage and waterlogging.
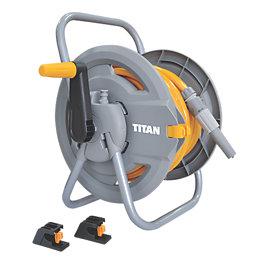
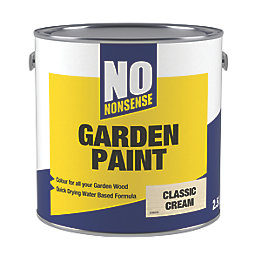
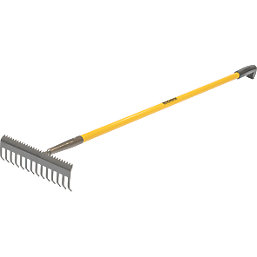
Tools & Materials Recommended To Level A Garden
If you’re looking into how to level a garden without a digger, the good news is that most home-sized jobs can be done with accessible hand tools. Using the right tools for garden levelling is important for creating a long-lasting and stable surface. These items and materials will help you move soil, check accuracy, and compact the ground in your garden.
Here’s a list of all the tools you’ll need for most domestic levelling jobs.
Preparing Your Garden Before Levelling
Thorough preparation is key when you’re learning how to level ground. This will make your levelling job faster and prevent common mistakes. The first step in preparing your garden is clearing the area of plants, stones, and debris so that you can work with the bare soil. Then, mark out the target finished height using stakes and a string line, or a straight timber and spirit level, as this will keep the whole area consistent while you work.
Next, assess how water is moving across your site and note any drainage low points. If you identify poor drainage or deep pooling, you may need to improve the surface grading or install a simple drain. If it looks like you’ll need plumbing work in the course of your project, we recommend a competent and suitably qualified NICEIC registered plumber.
Step-By-Step: How To Level A Garden By Hand
When exploring how to level a garden by hand, you’ll usually find that it’s achievable using basic tools and careful measuring. Make sure to work methodically and stop to check levels frequently. Like with many gardening projects, patience and accuracy are more important than speed for a quality, long-lasting result.
Step 1: Clear the area and remove turf
Remove plants, stones, and surface debris so you can start with a clean working area that gives you full access to the soil beneath. Mow the lawn if the grass is long, then cut the turf into manageable strips with a spade, around 20-25cm wide. Lift these strips up carefully if you’re planning to reuse it later, as stacked turf can be replanted once the base is level. Stripping turf also lets you check any compaction or rubble underneath, so you can address any underlying issues before filling.
Step 2: Loosen and break up soil
Use a fork or spade to loosen compacted soil across the area. By breaking up the top layer, you’ll help the new material bind and prevent future waterlogging. It’s important to work when the ground isn’t waterlogged to get the best results.
Step 3: Redistribute the soil
Use a shovel and a rake to move soil from high spots to more shallow areas. A wheelbarrow can be useful for this phase in larger jobs, and is one of the easier ways to learn how to level a garden without a digger if you’re working with a larger space. Try to aim for a gradual, even fill, rather than deeper single fills to avoid long-term resettlement.
Step 4: Fill low spots
Add a mixture of topsoil combined with sand or compost where needed to improve the garden’s structure and drainage. One common levelling mix is topsoil blended with a small amount of compost and sand, which will add firmness and drainage.
Step 5: Check levels frequently
Frequently use a spirit level and a straight timber, or a builders line between stakes, to confirm the surface is even and has the correct fall for drainage. Frequent checks will let you make small adjustments as you go, rather than having to carry out large reworks.
Step 6: Compact and smooth the surface
Go around each of the filled areas and compact them to remove any air pockets. For small areas, a hand tamper and a rubber-soled board are usually enough. For larger lawns, however, it’s best to use a water-filled garden roller for even distribution, taking care not to over-compact. Compact the filled areas in small stages, and re-check the levels between each pass.
Step 7: Replant or lay turf
If you’re planning to reuse turf you saved earlier, replace it carefully and press down to make contact with the prepared soil. For laying new turf or seed, follow supplier guidelines to ensure the best timing and aftercare. Water the newly-lain turf lightly to settle the material.
How To Level A Sloping Garden
Learning how to level ground can be slightly different if your garden has a slope. This may require moving more soil to create terraces or a gentle drop-off. Work in stages, and consider planning small retaining features like timber edgings or sleepers so that you can hold reprofiled levels. When you plant terraces with deep-rooted plants, it can help stabilise banks in the long term.
When working with a sloped garden, it’s also crucial to maintain proper drainage. Wherever you see water gathering, consider installing a gravel channel, a swale, or a French drain to direct the run-off to a safer outlet. Note that if drainage might affect structures or require major regrading, it’s best to seek professional advice and check for planning or drainage rules that might apply locally.
Finishing The Surface After Levelling
Finish your project by giving the whole surface a light roll or tamp to close small gaps. Then, add a final, thin layer of topsoil to create a smooth seedbed or turf base. Finally, lightly water the surface to settle your materials, then return after 24-48 hours and check for any low spots. Regular maintenance like seasonal scarifying, aeration, and top dressing will keep the surface healthy and even.
Common Mistakes To Avoid When Levelling A Garden
Levelling a garden on very wet ground can risk compacting the soil and creating long-term drainage issues, so be sure to wait for drier conditions if your garden is waterlogged. It’s also important to avoid adding deep fills in one go and instead compact the turf in layers so that you can reduce settlement. Skipping over accurate marking and regular checks in the preparation stage is another common mistake, which can increase the risk of uneven finished levels. Finally, avoid using an overly heavy roller on soft soils, as this will cause excessive compaction and poor growth for the roots.
How To Level A Garden - FAQs
With the right preparation and patience, anyone can learn how to level a garden without a digger. Here are some common questions and answers to use for quick reference when you’re figuring out how to level a garden by hand.